Create your own content delivery network redirector
Due Date - April 28, 2021, 10PM CST
Objectives
-
Learn to break down a very complex problem into smaller problems
-
Solve each smaller problem and bring them together to solve the larger problem
-
Learn how CDNs work and build your own CDN
Overview
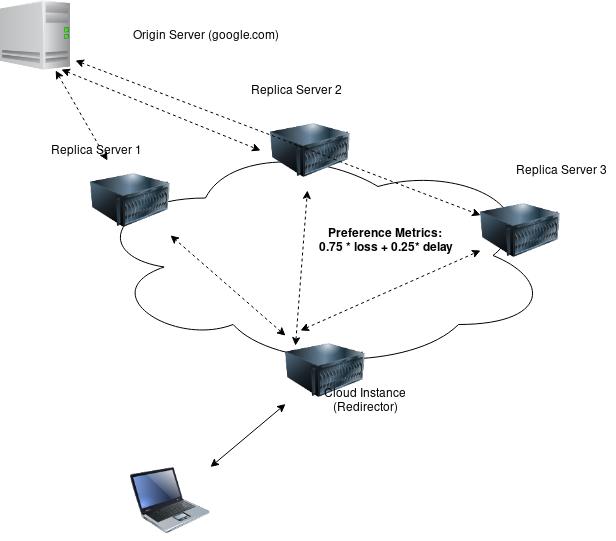
In this project, you are going to build on the first and the second project. You will build your own “CDN load-balancer/redirector”. A cloud typically hosts multiple copies (replicas) of the same content. Depending on where the request is coming from, it routes the requests a suitable replica. A primary component of any CDN is the entity called a load-balancer/redirector. The function of a load-balancer is route requests to the “most suitable” server. CDNs choose their own metric for defining which server is the most suitable. It can be the replica with the lowest latency, the replica with lowest loss, or a combination of multiple parameters.
In this exercise, you will create three replicas with the same content. You will also keep track of the delay and loss parameters to each replica. At the beginning, each replica will download some content from a website. When a request comes in, you will redirect the request to the most suitable replica (see the definition below). When the next request comes in, you will redirect that request to the most suitable replica at that time. The network conditions will change throughout the experiment.
Note that the load balancer does not act as a proxy. It simply tells the clients which server to connect to.
The client and server communications may use TCP or UDP.
Replica Server Specifications
The replica server takes three arguments:
$ replicaserver -p <PORT> -s <LOG FILE LOCATION> -w <web page to download>
1.PORT - The port server listens on.
2.Log file location - Where you will keep a record of actions.
3.w - Which webpage to download and serve.
For example:
$ replicaserver -p 30000 -l /tmp/logfile -w www.nytimes.com
Load Balancer Specifications
$ loadbalancer -s <SERVER-IP> -p <PORT> -l LOGFILE
The load balancer takes three arguments:
1.Server IPs - A list of replica servers' IP addresses
2.PORT - The port the servers listen on. They will all listen to the same port
2.Log file location - Where you will keep a record of packets you received.
For example:
$ loadbalancer -s replica_servers.txt -p 6543 -l LOGFILE
Client Specifications
The client (we name it anonclient) takes four arguments:
$ anonclient -s <LOAD-BALANCER-IP> -p <PORT> -l LOGFILE -f <file_to_write_to>
The client takes three arguments:
1.LOAD-BALANCER-IP - The IP address of the load-balancer/redirector.
2.PORT - The port the server listens on.
2.Log file location - Where you will keep a record of packets you received.
2.File to write to - Where you will write the retrieved content.
For example:
$ anonclient -s 192.168.2.1 -p 6543 -l LOGFILE -f test.txt
Client Requirements
- The client will simply open a connection to the load-balancer and request a content
- Design your own protocol headers for most efficient communication between the client and the load-balancer
- The client should be able to receive the content and write to a file
- The client should gracefully process incorrect port number and exit with a non-zero error code (you can assume that the folder is always correct). In addition to exit, the client must log the error.
Functional requirements
- You need to create more than one server that will be serving content.
- The server must open a TCP/UDP socket on the specified port number
- The server should gracefully process incorrect port number and exit with a non-zero error code
- The server should download the file specified by -p and save it to the memory
Protocol Specifications:
- Design your own protocol headers for most efficient communication between the load-balancer and the replicas. You may reuse headers from PA1/PA2, or come up with your own header.
- The client should connect to the replica server that has the highest preference.
- We define the preference as lowest combined value of weighed delay and loss. Lower value wins.
- Preference = 0.75*loss percentage + 0.25*delay in milliseconds - You will need to measure the loss and delay periodically. You may use ping.
- The load-balancer should probe the replica servers periodically and keep a list of preferences. You should be able to use a ping like program for this part.
- The load-balancer should be able to accept and process multiple connection from clients at the same time
Additional requirements:
- Code must compile/run on Google Cloud Ubuntu VM (18.04) - we will test your code only on the VM.
- For each packet received, log interaction at the load-balancer in the following format:
Request from <CLIENT IP>. Redirecting to <Replica IP>, Preference <Preference>, Next Preference was <Next lowest preference> to <Replica IP>
- If error occurs: log the following:
"Error: Unable to handle request between <Client IP>, <Replica IP>, <Preference>, <Error details>
- Set the loss and delay using these commands:
apt-get install -y kernel-modules-extra
apt-get install -y kernel-debug-modules-extra
reboot
Add loss or Delay
tc qdisc add dev <ethernet device, e.g, eth0> root netem delay 200ms
tc qdisc add dev <ethernet device, e.g, eth0> root netem loss 20%
Reset loss or delay
tc qdisc add dev <ethernet device, e.g, eth0> root netem delay <new delay>
Delete everything
tc qdisc del dev eth0 root
